All posts by Roman

UniFi Protect behind nginx proxy

Below is a snippet of nginx configuration that will enable access to your UniFi Controller (eg. Unifi Cloud Key Gen2) using nginx reverse proxy.

server {
        listen 443 ssl;
        server_name example.com;

        location / {
                include /etc/nginx/proxy_params;
                proxy_pass https://IP_ADDRESS_OF_THE_CONTROLLER/;

                # WebSocket support
                proxy_http_version 1.1;
                proxy_set_header Upgrade $http_upgrade;
                proxy_set_header Connection "upgrade";
        }
}

Installing Arch Linux ARM on Raspberry PI 3

Insert SD card to your system.

sudo fdisk -l
sudo fdisk /dev/sdX

Create partitions.

  • Clear partitions (o)
  • Create boot partition (n, p, 1, enter, +500M, t, c)
  • Create system partition (n, p, 2, enter, enter)
  • Write partitions (w)
sudo mkfs.vfat /dev/sdX1
sudo mkfs.ext4 /dev/sdX2

Mount new partitions.

sudo mkdir /mnt/boot/
sudo mkdir /mnt/root/

sudo mount /dev/sdx1 /mnt/boot/
sudo mount /dev/sdx2 /mnt/root/

Download and install Arch Linux ARM.

wget http://os.archlinuxarm.org/os/ArchLinuxARM-rpi-aarch64-latest.tar.gz
sudo su
tar zxvf ArchLinuxARM-rpi-aarch64-latest.tar.gz -C /mnt/root
mv /mnt/root/boot/* /mnt/boot
sync
umount /mnt/boot/
umount /mnt/root/

Remove SD card, insert it into Raspberry PI and boot it to complete the installation.

pacman-key --init
pacman-key --populate archlinuxarm
pacman -Syu

Append value to Multi SZ Registry value using PowerShell

In the sample bellow the PowerShell script will append a service into RemoteAccessCheckExemptionList in registry. It also checks whether the value already exists there or not.

$subkey = 'SYSTEM\CurrentControlSet\Control\SecurePipeServers\SCM'
$value  = 'RemoteAccessCheckExemptionList'

$reg = [Microsoft.Win32.RegistryKey]::OpenRemoteBaseKey('LocalMachine', $server)
$key = $reg.OpenSubKey($subkey, $true)
$list = $key.GetValue($value)

if ($list -notcontains 'MyServiceName') {
  $list += 'MyServiceName'
}

$key.SetValue($value, [string[]]$list, 'MultiString')

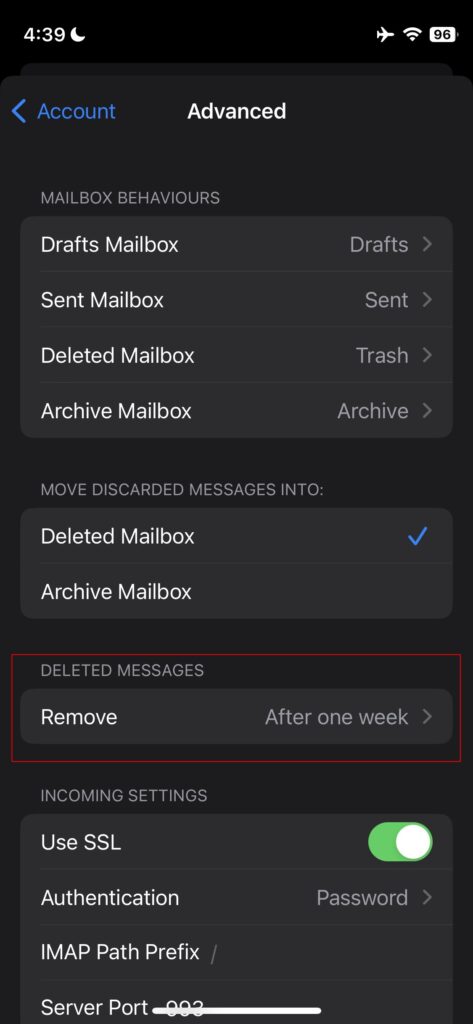
Wondering why messages are deleted from your trash after a week?

I had a special script that removes e-mail from Trash after 90 days. But one day I was looking for a message older than 7 days and realized that older messages are no longer in trash!

I checked Roundcube settings, but it does not have such option. There is only an option to delete all messages from after logout.

Auto expunge can be configured in dovecot, but there was not such configuration:

doveconf | grep expunge

People on the internet were pointing to mail clients like Thunderbird. After some more digging I found out the iPhone by default has such setting! OMG!!!

You need to go to your mail account advanced settings on your iPhone.

Automatic external monitor switch on Arch Linux

Install autorandr.

sudo pacman -S autorandr

Save current configuration. If you are on notebook you can eg. call it mobile.

autorandr --save mobile

Now connect you external monitor. Change the monitor settings as you wish and save it.

autorandr --save docked

From now on, when you connect external monitor it will automatically switch to it. If you disconnect it it will revert back internal monitor only.

Plone 6 and Azure login

If you have Microsoft 365 you can setup Plone to use Azure login. You need to install pas.plugins.authomatic. It also supports Volto.

In Azure you need to create App Registration. You can follow this guide.

In API Permissions you need to add User.Read.All Application permission.

In Certificates & secrets create a new client secret.

Finally the PAS Authomatic configuration looks like this:

{
    "azure": {
        "id": 1,
        "display": {
            "title": "Azure",
            "cssclasses": {
                "button": "plone-btn plone-btn-default",
                "icon": "glypicon glyphicon-github" 
            },
            "as_form": false
        },
        "propertymap": {
            "email": "email",
            "name": "fullname" 
        },
        "class_": "authomatic.providers.oauth2.MicrosoftOnline",
        "domain": "ADD_YOUR_TENANT_ID",
        "consumer_key": "YOUR_APP_REGISTRATION_CLIENT_ID",
        "consumer_secret": "YOUR_CLIENT_SECRET",
        "scope": ["openid profile"],
        "access_headers": {
            "User-Agent": "Plone (pas.plugins.authomatic)" 
        }
    }
}

Lock Screen and Hibernate in Ubuntu 22.04

In Ubuntu you can hibernate your PC by using the following command:

sudo systemctl hibernate

The problem is it does not automatically lock the screen. To lock the screen use:

xdg-screensaver lock

Now we can combine it together:

xdg-screensaver lock && systemctl hibernate

Note that you will need to enable your user to execute systemctl hibernate without sudo. You can do it by editing /etc/sudoers. Just add:

your-username ALL= NOPASSWD: /usr/bin/systemctl hibernate